1980 Kawasaki KDX80 back to life


nobog

Member
Mar 25, 2021
21
15
Hello all, first post but not first vintage salvage,

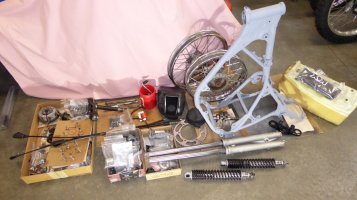
The latest is a 1980 KDX80, fairly rare as by Japanese standards a low-seller. A rolling chassis with everything else in a box, a giant puzzle. Powder coated the frame, new fenders, re spoke the rear wheel, and redo the seat with a "KX" imprint cover as a "KDX" imprint is non-existent. All new cables. New tank decals. Rebuild the forks, new rear shocks but I might reuse the OEM ones just for that original look, not sure yet.

Engine had a bad lower rod bearing which is the worst of all news as a rod kit is non-existent also - I mean nowhere, not USA, not Europe, not any vintage Kaw supply so the crank shop needs to refit a more modern rod along with the necessary machining and $$. Vapor honed (liquid sand blasting) the cases, jug, head, and hubs.

So... a few photos, more as I finish this up:
KDX80_1_s.jpg
box_of_parts_s.jpg
progress_2_s.jpg
In_process_s.jpg
 
Last edited:

RM_guy

Moderator
Damn Yankees
LIFETIME SPONSOR
Nov 21, 2000
7,045
208
North East USA
I love seeing these vintage bike rebuilds. Mostly for nostalgia but also because I just don't have the patience to do all of that detailed work. Nice job! Thanks for posting,
 

nobog

Member
Mar 25, 2021
21
15
Some more pics,
Tank before and after, showing the "starboard" side and then the engine cases, just waiting on the crankshaft assembly. Tank is not perfect but considering what it looked like I am happy with the finished product. "It's only new once"
tank_before_s.jpg

tank_after.JPG

motor_2_s.jpg

engine_cases_s.jpg
 

nobog

Member
Mar 25, 2021
21
15
Getting ready to start the re-assembly, here is the right foot peg and some notes:

I added the black Delrin bushing as the hole for the brake rod was oval shaped.
I machined a SS sleeve for the pivot bolt as the OEM was missing and I couldn't find one.
The brake lever is supposed to be black but I painted it silver - I just like the look and the contrast
It really give me an appreciation for the engineering that went into something so seemingly simple, all the more as this was designed some 42 years ago.
footpeg_assy_1_s.jpg

footpeg_assy_2_s.jpg
 

nobog

Member
Mar 25, 2021
21
15
Looks nice! Ya know...if you don't have a few parts left over you did it wrong =B=)_BGRIN_
Yep, I hear ya, but with anything like this you have to be careful of what's missing. Over the years these things were taken apart and put back together - either by a 13 year old kid (don't bash me, I was 13 once and screwed things up good =)) or by the dad who thought he knew what he was doing and you get the "I don't think this part is necessary" syndrome. So you need to pay attention, using a good parts guide, to get these things the way they should be. One of the biggest blunders is stuffing a SAE thread bolt into a metric thread - no, they are not interchangeable !

Anyway, a few more pics, the swing arm and the brake hubs:
swing_arm_1_s.jpg

swing_arm_2_s.jpg

hubs_s.jpg
 

nobog

Member
Mar 25, 2021
21
15
Motor ready to go back into the chassis - first photo - timing. Yes, those are "points", our younger generation may have never seen such a thing but those provide the ignition switch to fire the plug from the earliest motor made to the mid 80's. After working on such, you realize what a wonderful thing CDI is, much like fuel injection.
motor_timing_s.jpg


So... here it is in all its 10hp glory! (the service manual claims 15 hp @ 11,000 rpm but I don't know if I buy that)
motor_4_s.jpg

motor_2_s.jpg

motor_1_s.jpg


Notice the exhaust port on the cylinder below, there is no mounting studs or tapped threads for the pipe, the pipe seals with an Oring and is held in place by the way the pipe is mounted to the frame - first time I've seen anything like this !
motor_3_s.jpg

Next up, final assembly
 

RM_guy

Moderator
Damn Yankees
LIFETIME SPONSOR
Nov 21, 2000
7,045
208
North East USA
That is one nice clean motor! I hear ya on points. I used to carry a modified nail file with me on rides just to clean off the points when I was miles from nowhere!
 

nobog

Member
Mar 25, 2021
21
15
Go to put the shifter on (never had the OEM one), this is an aftermarket EMGO, so of course it hits the sprocket cover on the upshift, so I mill out a clearance slot - not sure if it will stay permanent but for now I can try it out.
shifter_1_s.jpg

shifter_2_s.jpg
 

RM_guy

Moderator
Damn Yankees
LIFETIME SPONSOR
Nov 21, 2000
7,045
208
North East USA
Isn’t that always the way. Make sure you add some large radii at the bottom of the notch to eliminate any stress risers. I normally remove the sprocket cover. It just collects crap.
 

nobog

Member
Mar 25, 2021
21
15
One "extra" part. I looked through every parts PDF for this model and can't find anything like it. It looks like a wheel spacer but mine are all accounted for. It was in the bucket of parts I got with the bike but that doesn't necessarily mean anything.
extra_part.JPG
So into the parts pile it goes!
 

nobog

Member
Mar 25, 2021
21
15
So… that just about wraps this one up, I need some new rear brake shoes as the travel is all used up but that’s no big deal.
A few items if anyone is considering such a project:
  • Assume that the guy selling the thing is lying – it will be in much worse shape than he will ever say.
  • Check eBay or some on-line parts stores for part availability before you buy, a good item to check is the carb intake boot – those kinds of rubber parts will always crack and many replacements are long gone. OEM body parts are rare also.
  • Don’t be afraid to order from overseas – lots of these weird parts are actually available from Thailand but go through eBay.
  • Everything takes longer and cost more than you originally thought – that’s just a fact of life and applies perfectly to an endeavor like this. (this took almost 5 months – and I’m retired!)
  • Never, ever, tell your girlfriend or spouse how much you spend on these things – this is self explanatory.
Fill the tranny and put some premix in and it fires right up in 3-4 half hearted kicks, settles into an idle and I am all set. Some photos:
KDX_1_s.jpg

KDX_9_s.jpg

KDX_10_s.jpg

KDX_12_s.jpg

KDX_14_s.jpg

KDX_11_s.jpg
 

nobog

Member
Mar 25, 2021
21
15
Update,

It fired up ok and ran "fine" but just didn't seem to have any spunk, I have no baseline what this thing should perform like but certainly lacking something. Long story short - the spark arrestor (remember this is a KDX) was plugged up guessing 90 %. Of course its non-removable so I poke and stick whatever I have to free up some flow area. Wind up drilling a 3/8" hole through the center, I will work on something bigger but I need a drill extension of nearly 12".

And ... holy cow, feels like double the hp. I am most pleased. I will look into a straight thru aftermarket silencer but I am not hopeful, the OEM silencer has a curved pipe welded to the main silencer portion so its not a simple bolt-on (think universal muffler) endeavor.
 

nobog

Member
Mar 25, 2021
21
15
KDX80 # 2 - or here it goes again!

Yep, found another, but this one will not get the "full monte". No powder coating or zinc plating. Tank mostly shot, had to send that out for professional repair. Missing the side panels and front # plate. It didn't have spark - turns out they put new points in it and had to re-solder the wire to the top of the condenser - well - they had a huge gob of solder and that was shorting out on the flywheel, so at least that was a simple fix. At least the crank is good. Wheels and hubs good. The usual, new seat cover, rebuild the forks, new handle bars, and throttle cable, I will keep the clutch cable and front brake cable. The rear shocks are shot but they are all shot this vintage.

The shift shaft was shot (shift lever welded to the shaft) so took the motor apart and checked everything over, a couple of busted fasteners no big deal. Pipe has a 5" hairline crack that needs welding, engine cases needed a bit of a weld job also.

I won't be doing detailed updates like the last one, we'll just see how it goes. Got everything apart and the frame primed:
 

Attachments

  • before_1.jpg
    before_1.jpg
    197.5 KB · Views: 362

RM_guy

Moderator
Damn Yankees
LIFETIME SPONSOR
Nov 21, 2000
7,045
208
North East USA
I just wondering how hard it will be to not to the "full monte" once you get rolling! Looking forward to see it as it progresses even if you can't do all the detailed pictures.
 

nobog

Member
Mar 25, 2021
21
15
Engine # 2 is done, the cylinder has a significant score but I'm going to run it for now - bought a NOS cylinder and piston, not sure if that will make it on the bike or not. "Paint Drying" in pic #2, going to be 95 deg today so I thought I would give the paint a good set.
engine_final_s.jpg

parts_drying_s.jpg
 

nobog

Member
Mar 25, 2021
21
15
Assembly - looks just like the first one...
* pipe out for welding - two 3" cracks
* seat out for a new cover
* tank is out for a major overhaul
* a few misc items still on order; rear tire, "Kawasaki Green" paint, misc nuts & bolts, tank decals, front fender

That's my 1978 125RM behind the KDX

assembly_1.JPG
 

RM_guy

Moderator
Damn Yankees
LIFETIME SPONSOR
Nov 21, 2000
7,045
208
North East USA
That RM in the background brings back fond memories. I raced the ‘77 RM 125. 3 of my friends made a deal for $1100 a piece and then we bought FMF hop up kits for them.
 

nobog

Member
Mar 25, 2021
21
15
More:

* Somehow the clowns that owned this thing before threw-out the rubber tank pads - how is that possible? replaced with new OEM ones.
* The non OEM coil was mounted with one 10-24 bolt with a wing nut so I made a real coil mount.
* The rear tank mount is a mystery. I have the correct OEM rubber mounting block but after 2 hours of trying on KDX #1 to make it work I gave up and made my own - same for KDX #2. I cannot find a pic anywhere of what its suppose to look like - very unlike the typical Japanese assembly quality. Its like everything is a 1/2" off - the tang on the tank will simply not fit into the OEM mounting rubber block. I originally though I had a tank from a different model but both these tank are identical.

under_tank_s.jpg


Top Bottom