2004 Husky wr 250
- Thread starter Tugsy
- Start date
You are using an out of date browser. It may not display this or other websites correctly.
You should upgrade or use an alternative browser.
You should upgrade or use an alternative browser.
Yeah the US spec pipe could be different. Mine had a conical washer spot welded into the mouth of the pipe that reduced the opening to 50%. It's probably to get it to conform to Euro road laws. I checked the handbook for differences last night - the US WR seems to have the CR tail pipe (looks neat). The Euro one is half as long again.
Having your barclamp in the forward position will weight the front more so so may want to run a bit less of the fork through the clamp. I'm using the 'no offset' clamps from the '01 model. They just feel more comfortable for my height and keep the steering neutral. Like you say, you just have to play round with it.
Guys,
Thanks for the info. Tugsy I to started the painful process of trying to put the contents of the WRkit on my bike, I've got the headlight working,but it seems I am missing some stuff,I have no socket for the taillight or the pick up and wire for the speedo,nor the whatever mounts the speedo to the metal bracket,are they rubber grommets or what??idid however get a real nice new starter solenoid which kinda makes me think I've received a kit for a TE but the jets and carb slide appear to be for the 2 stroke.Oh well got her in pieces now Husky seems to grease stuff from the factory unlike the jap companies,the linkage,swingarm pivot and steering head all seem to have lots of grease in them(nice).The saga continues. :cool:
Jeffro
- Thread starter
- #34
JG,
I am in similiar boat with different parts. You wouldn't happen to have photo of front headlight wire to bulb? I think that I am missing but not sure. The speedo wire for me is here but no magnet for disc. Argh... Anyway it will give me something to do while snow melts. I did not get any speedo mounts either or a jet kit with slide. I am visiting my dealer tomm. and we are going to go thru and make a list of parts. I will post what I find out. I will look at my rear light assembly this weekend and let you know on that as well. How did you get the rubber straps on headlight?
I am in similiar boat with different parts. You wouldn't happen to have photo of front headlight wire to bulb? I think that I am missing but not sure. The speedo wire for me is here but no magnet for disc. Argh... Anyway it will give me something to do while snow melts. I did not get any speedo mounts either or a jet kit with slide. I am visiting my dealer tomm. and we are going to go thru and make a list of parts. I will post what I find out. I will look at my rear light assembly this weekend and let you know on that as well. How did you get the rubber straps on headlight?
Tugsy,
on the wiring harness ,one end has two connectors this will plug into the taillight,the front of the harness has two small connectors which plug into two of the three terminals that go into the headlight bulb,there is also a spade connector with I think three wires going into it that plugs into the wire coming from the voltage regulator,there is a terminal block which plugs into a smaller harness with three small sockets with bulbs for the idiot lights for the speedo dash.there are also two connectors about half way down the length of the harness one has a spade connector that plugs into the yellow wire coming up from the stator,the other is a ground that i bolted to the bolt that mounts the coil to the frame.WHEW! i hope you can understand my gibberish,it took me a few minutes to figure out what went were(no instructions)and the wiring diagram is all but useless. on my bike the magnet for the speedo is already mounted on the disc,however the way the wire comes out of the pickup down on the fork looks a little vulnerable some sort of guard would be nice.yea i did get the rubber straps for the headlight (4) and man are they a pain to attatch them to the headlight housing (when you get them you'll know what i mean.the speedo mount looks like a silver meatal H with with holes at each point ,i got that but no rubber mounting hardware to mount the speedo to the bracket.good luck with your hunt let me know what you find out.
Later
Jeffro
You have to force the rubber knobs through the holes,Iused a small screwdriver to poke the the rubber through little by little it took me about 20min.to do all four.Good luck!! It does help to warm up the straps and lube the knobs.wait a minute did that come out right.... eeerrr..... aaah........yea..... right never mind you know what i meant. :ohmy:
Jeffro
Jeffro
- Thread starter
- #39
Got the light kit on the bike. Here was my procedure:
1. Remove front number plate and the 2 support brckets at lower triple clamp.
2. Remove tank.
3. Remove yellow short wire from the voltage reg to the spade connection under tank.
4. Route the wiring harness along top frame tube to the front headlight area. Front of harness will have 1 yellow spade connection to go to voltage regulator. 1 small yellow and blue connectors to go to headlamp. Yellow one goes to farthest left connector and blue one goes to farthest right connector. White clip with several terminals connects to speedo lights which are 3 little bulbs that connect into speedo cover.
5. Attach round blue connector in middle of harnness to under the tank terminal post where others are already attached. Connect yellow spade to stator connection from stator. This is to repace connection you removed in step 3.
6. I ran back light of harness thru air box attached to frame. I have not finished rear light yet.
Speedo Connection.
1. Insert threaded end into hole by front brake caliber. it is there just look carefully. Thread in until you see it flush on backside of caliber area.
2. Connect wire to the speedo unit. There are 2. Spin wheel to see if unit is working. Magnet for unit should be installed on front disk from factory.Mine wasn't but I figured it out.
3. If it is working disconnect and route the speedo cable up just like the brake cable and zip ty together all the way up.
4. Loosen the bar clamps from under the top triple clamp. Lift up and insert speedo mount with rounded bolt holes facing down on top top trile clamp area and reinsert bar clamps.
5. Insert speedo unit into plastic holder and then attach to speedo mount. There should be 2 rubber o ring things that snap into speedo mount and then screw 2 small palstic screws with washers into under side of speedo mount. Connect 2 wires again and your done.
Hope this helps.
Tugsy,
Thanks for the info.Hey on your taillight do the wires have connectors on the ends and does the socket just fit into one of the two holes in the underside of the taillight lens? the taillight in the manual must be for the euro bike not the U.S. version.
Jeffro
we are really keeping this thread going huh!? :laugh:
Glad to find this thread!
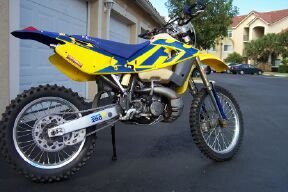
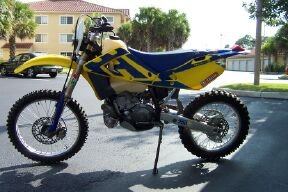
Hey guys! :cool: I too sold the 4 stroker (01 KTM 400MXC) for a Husqvarna WR 250. :yeehaw:
My bike is actually a 2002 model I purchased from a former Husky Rep. It was loaded with aftermarket work and goodies. If you have any questions about the mods ask away! :laugh:
Pro Circuit Woods pipe and rock protector
PC forest service approved Spark Arrestor
Revalved/resprung suspension (Fast By Ferraci)
Ported cylinder (52 broad HP on the Dyno) Great torque.
WER Steering Damper (needed an Acerbis headlight)
Aluminum Skid plate, rad guards, rear brake fin, etc.
TI Pegs
Renthals with busters.
3.4 IMS tank, clear.
Tall seat with gripper cover
Carbon fiber rear brake guard
and a big box of goodies!
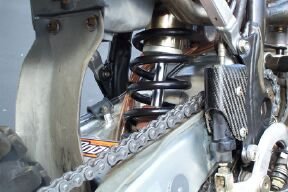
Attachments

Tiger,
Great lookin' scoot. looks like you got quite the works bike for the woods. I can't wait to get mine dirty. that tank looks mighty big does it seem to get in the way? any idea what brand pipe guard,skid plate and rad guards do you have? I'd like to get them for mine.
later
Jeffro
Great lookin' scoot. looks like you got quite the works bike for the woods. I can't wait to get mine dirty. that tank looks mighty big does it seem to get in the way? any idea what brand pipe guard,skid plate and rad guards do you have? I'd like to get them for mine.
later
Jeffro
Husqvarna After market products...
Jeffro & Tugsy,
Sorry for the tease... ;)
Check out D1H Racing (clicky)
1. The Rear fin is definitely a DH1 product!
2. The skid plate/case guard is also a DH1 product!
I'm uncertain about the rad guards... :think:
I'm uncertain about the PC pipe bolt on aluminum guard...
I'm uncertain about the rear brake carbon fiber guard...
3. The elevated bar mounts are Fast By Ferracci (FBF). :)
4. The quick adjust aluminum clutch wheel is also FBF.
5. V-Force is the brand of reed valve/carb manifold.
6. The tall seat cover is an N-style All-Trac (gripper) brand.
7. The headlight is an Acerbis unit (trimmed at bottom to clear WER damper).
8. Twin Air makes the air filters.
I recently purchased replacement F/R brake pads via Moose Racing.
I promise to take a closer look this weekend when I do some maintenance. :yeehaw:
Jeffro,JG614 said:Tiger,
Great lookin' scoot. looks like you got quite the works bike for the woods. That tank looks mighty big does it seem to get in the way? any idea what brand pipe guard,skid plate and rad guards do you have? I'd like to get them for mine.
later
Jeffro
The tank is very slim in width...I don't honestly notice it.
Vertically the tank IS BIGGER however. The gas cap is higher and plug changes are tougher (but still possible). It is a much better design than my 2000 Yamaha YZ 250 tank FWIW. The gas cap does leak. I bought a replacement one in case, but it probably just needs a thicker gasket! :ride:
- Thread starter
- #50
Just finished putting CRD Offoad farme guards on and a pro moto billet rear disk guard. Both bolt on easliy. Disk guard requires just a little bit ground off top side so both bolts will slide in easier. Just shave a liitle of top rear at elbow where it rubs up against lower swingarm. Both look awesome.
Similar Topics
M
- Replies
- 0
- Views
- 286
M
A
- Replies
- 0
- Views
- 416
A
- Replies
- 1
- Views
- 626
K
- Replies
- 0
- Views
- 59
K
FRESH VIDEO
-
PulpMX Show 583 – Malcolm Stewart, Daxton Bennick, Mitch Payton & Justin Rodbell w/ Michael Lindsay
Mon, 29 Apr 2024 07:15:59 CDT
-
Weege Show: Philadelphia Post Race with Stew and More
Sat, 27 Apr 2024 23:36:33 CDT
-
Weege Show: Philadelphia Supercross Preview
Fri, 26 Apr 2024 20:40:38 CDT
-
Philadelphia PulpMX Fantasy Preview & Strategy | Before You Pick! 2024 ft. RotoMoto
Fri, 26 Apr 2024 13:01:18 CDT
-
Jason Lawrence VS Chad & Tate Reed! Battles at Dade City MX
Thu, 25 Apr 2024 19:00:22 CDT
-
Fly Racing Moto:60 Show – Philadelphia SX 2024 with Zach Osborne & Daniel Blair
Thu, 25 Apr 2024 11:48:15 CDT
-
When is the right time to move up to the 450? | Lewis vs. Kellen: More Than Moto Ep. 13
Tue, 23 Apr 2024 17:01:26 CDT
-
When Dad’s Away, The Kids Will Play!! Reed Sweep at Dade City!
Tue, 23 Apr 2024 14:45:00 CDT
-
The Current State of FMX, Crashes, & Why Two-Strokes.. | Taka Higashino on the SML Show
Tue, 23 Apr 2024 13:00:25 CDT
-
PulpMX Show 582 – RJ Hampshire, Evan Ferry, Phil Nicoletti & Donnie Emler Jr w/ Stephenson & Ginolfi
Sun, 21 Apr 2024 22:26:03 CDT