Top End on a 1995 Thru 2002 KDX 200
This month's tech tip comes to us from Bryan Kimsey. A big thanks goes out to Bryan for taking time while doing his top end to take pictures and let us post them here on JustKDX for everyone to use as a reference.
Take a minute and visit Bryan's page at http://www.bryankimsey.com and tell him thanks.
These are some pictures I took while doing the top-end on my KDX200. Use them for reference when doing your own KDX and to see what it is you're cleaning up! I was surprised at how much spooge I found inside the valve covers, in spite of how clean the piston and cylinder head were.
Bike History: I bought this bike used in October '01, as the 3rd owner. It appeared to not have been ridden much at all- the tank graphics were in almost new condition and "Kawasaki" on the seat is unworn. However, the previous owner was using motor oil on the air filter and who knows what oil in the engine. The bike was running extremely rich with stock jetting. I immediately started on Yamalube 2R, which I've found to be an excellent, clean burning, oil. Cleaned the Twin Air air filter with kerosene and washed out just tons of red dirt. Rode the bike casually for a couple of months, but started thinking about doing the top end in December. Plus, most KDX owners recommend cleaning the KIPS valves yearly and who knows when/if these were last done. Here we go!
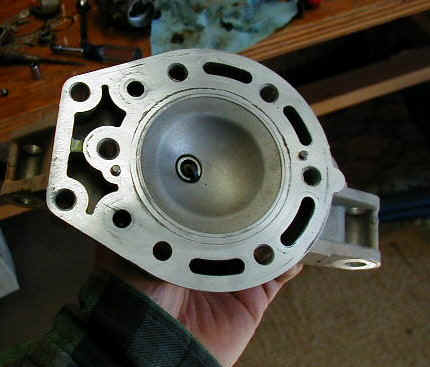
First, here's the cylinder head, just as I pulled it from the bike. Spotless!! At this point, I was almost ready to clamp the thing back on and go riding, but I'm glad I didn't- read on.....
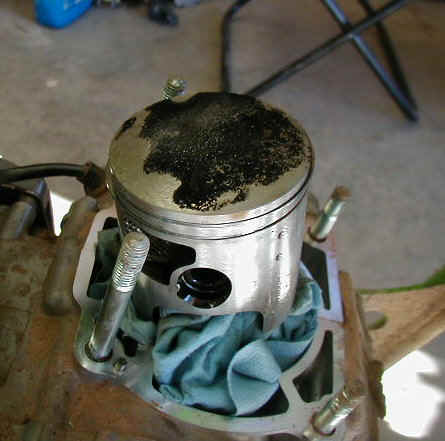
Here's the top of the piston. A little carbon- pretty typical of what my YZ250 looked like after the previous owner used BelRay MC-1 for a couple of years. Can't expect Yamalube to clear this up....
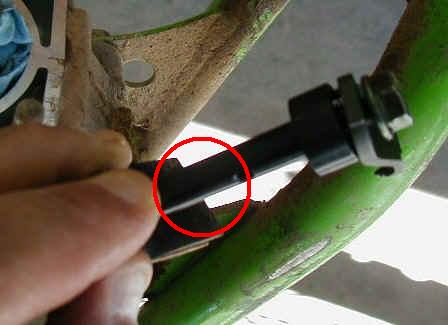
This is the shaft connecting the bottom end to the top end valve gears. It has a reverse thread and a flat spot. It is VERY important to support this shaft when tightening or loosening the nut. There's a flat spot right above my finger- I used a small adjustable wrench to hold the shaft. I'm pulling the rubber boot down in this shot to expose the shaft. Also see "Top End Tips" article on JustKDX for further detail.
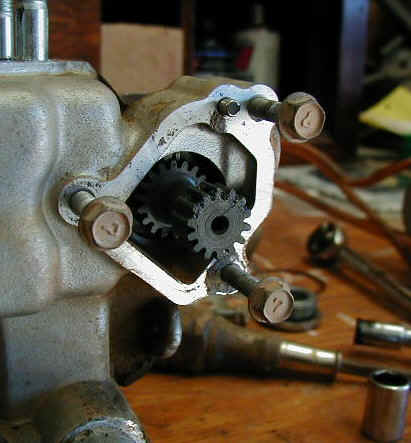
With the cylinder head sitting on my bench, it's time to disassemble the KIPS valve. Here's the gears that turn the valves via the connecting shaft from the bottom end. Still looking pretty clean...
Removing the KIPS valve
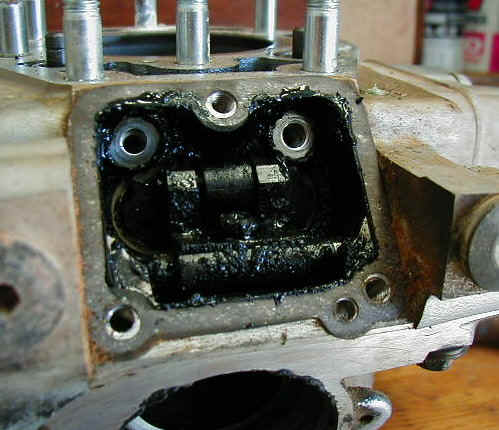
Here's where it gets ugly! This is looking into the main valve area and you can see how spoogy this looks. Awful. The bolts holding the cover on have been removed, but they were totally buried in spooge. THIS is where I was glad I didn't just cap the bike and go riding, and this is what I came to clean.
Here's a shot looking up into the exhaust port with the KIPS valve closed (top of head). The dark area where the arrow is pointing in the bottom picture is the powervalve.
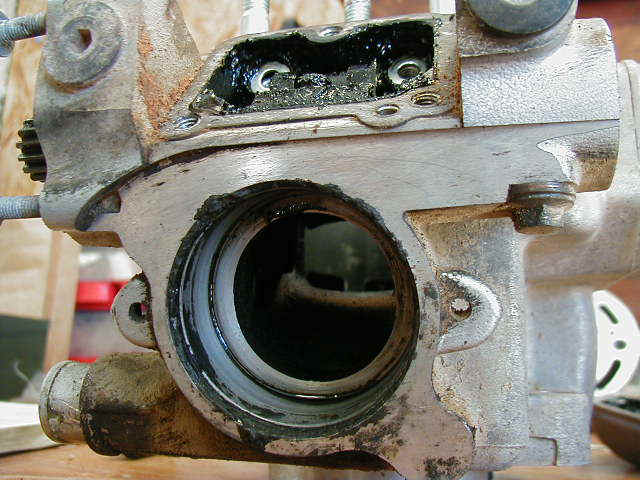
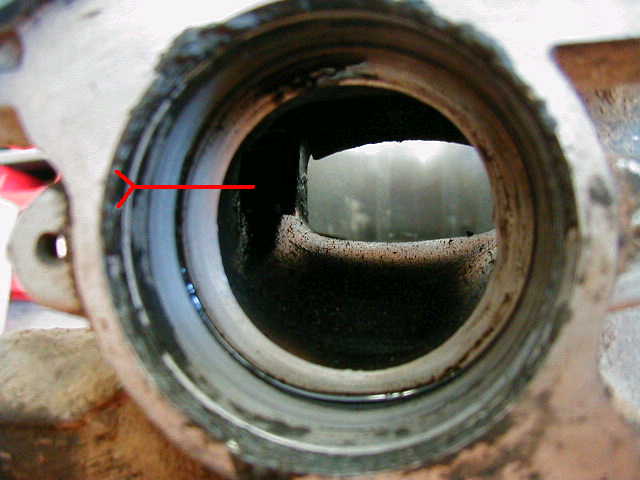
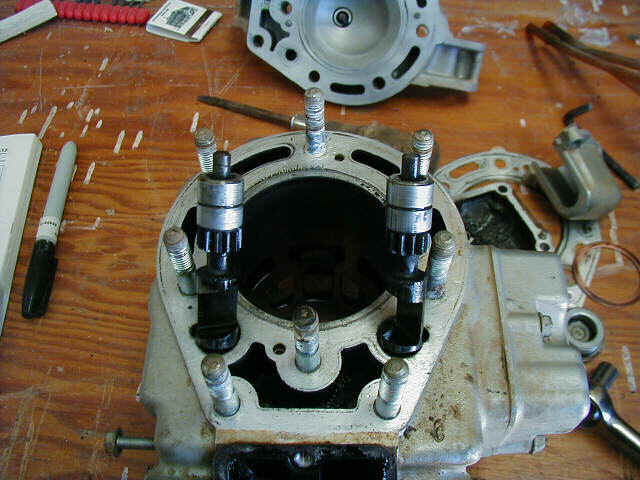
This is a shot of the shafts prior to actually removing them from the engine. The gears on the shaft (at bottom of picture) are facing downward. The shaft on the left has a groove in it about 2/3 of the way up the shaft, the other doesn't. The covers for these gears were on TIGHT- use a good allen wrench to loosen them!
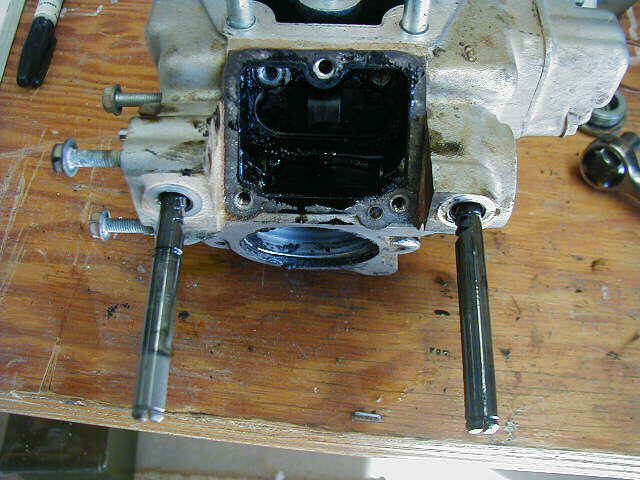
And here, finally, are the actual side valves, just as they came out of the engine after pulling the shafts above all the way out. Again, note the groove on the top of the left shaft, just above the collars.
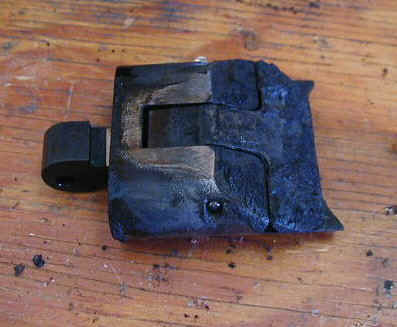
After removing everything else, I was able to get the main valves out. Mine were heavily carboned and I had to chip away some carbon before I could get them out of the engine. Here you can see carbon on all surfaces. I'm sure this has a lot to do with my bike's rough running at low RPM

Okay! Time to clean and re-assemble. I checked the ring gap and it was .635mm which is awfully close to the service limit, so I'll be using a new Pro-X piston and rings.
Cleaning and Reassembling the Top End
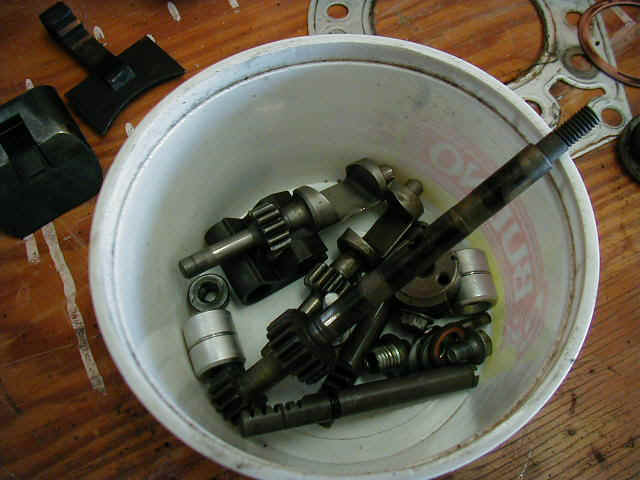
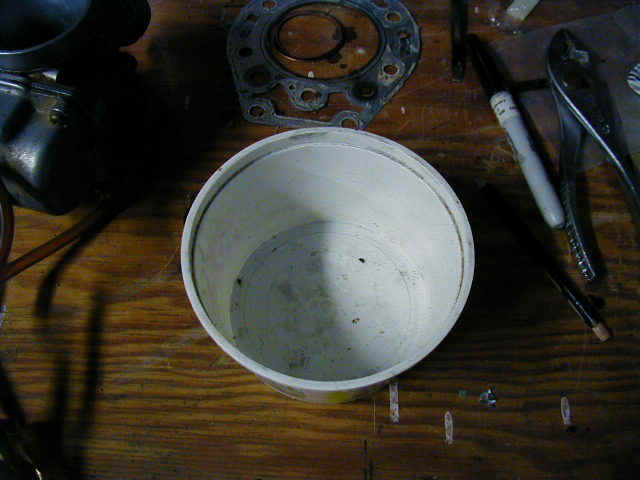
And here's a bucket full of kerosene-cleaned parts almost ready for re-assembly. Before I actually put them in the top-end, I'll wipe them down again with a clean, pre-mix lubed cloth to remove any stray dirt. Moly lube will be used where called for.
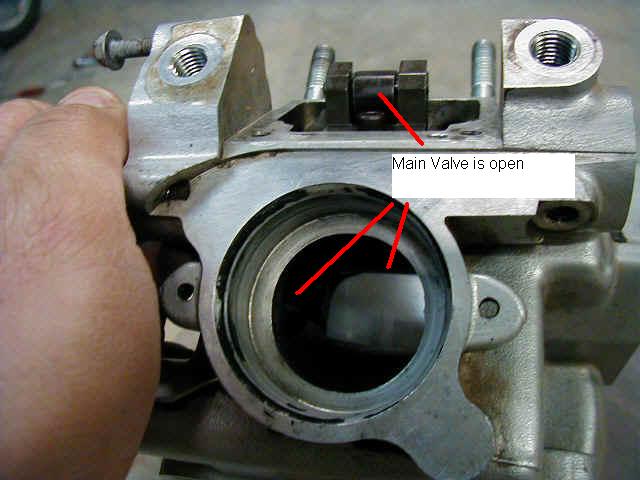
Here's some things to check for in re-assembly. First, make sure you get the correct valves and valve gear shafts in the right place. The grooved shafts go on the left hand side of this photo. Before disassembly, I marked the top of the valves with a Sharpie marker. This made re-assembly a lot easier. I used Yamalube 2R to coat all metal parts during reassembly. Slide the main valve in first, using lube to make it easier. Check for smooth operation. Then, install the valve gear shafts in the holes(the 2 threaded holes above). Make sure they're pushed all the way in. Then insert the left side (respect to photo) valve. With the gear shafts all the way in, the valves should be shut, as in this photo.
In this picture, you can just see a shiny surface where the arrow is pointing- that's the closed valve. Slide the shaft that controls the main valve in and lock it down with the small allen head screw. By turning the shaft with your finger, you should see both the main valve and the left hand valve open and shut. When the left hand valve opens, it should open flush with the cylinder. If not, rotate so that it does. Likewise, when it's shut, it should be fully shut.

Here's the valves open. I could not get a shot of the valve opened, but you should easily be able to see it open. Also notice that the main valve is opened- compare the opening of the main exhause port in these two shots. Once you have the left hand valve opening and shutting correctly, install the right hand valve and gear. Install the ball bearing detent, spring, washers, and bolt. Set the timing on the right hand valve the same way. When the rod is turned completely one way, both valves should be shut and shut flush. When turned the other way, they'll be open and opened flush with the cylinder wall. Visualize exhaust gas flow and you should be okay.
Check for smooth operation at all times and add lube if necessary. If anything binds or feels stiff, fix it before going any further!! When you get done reassembling the head, your parts bucket should be empty, of course!
After re-assembling the KIPS valve, the rest of the top-end job is pretty straightforward. Make sure your piston rings center on the locating pins, keep gasket surfaces clean, torque everything to specs and you should be fine. The bike should start right away, and indeed, mine started on the 2nd kick after reassembly- just the way I like it!
Happy KDX'ing.
This month's tech tip comes to us from Bryan Kimsey. A big thanks goes out to Bryan for taking time while doing his top end to take pictures and let us post them here on JustKDX for everyone to use as a reference.
Take a minute and visit Bryan's page at http://www.bryankimsey.com and tell him thanks.
These are some pictures I took while doing the top-end on my KDX200. Use them for reference when doing your own KDX and to see what it is you're cleaning up! I was surprised at how much spooge I found inside the valve covers, in spite of how clean the piston and cylinder head were.
Bike History: I bought this bike used in October '01, as the 3rd owner. It appeared to not have been ridden much at all- the tank graphics were in almost new condition and "Kawasaki" on the seat is unworn. However, the previous owner was using motor oil on the air filter and who knows what oil in the engine. The bike was running extremely rich with stock jetting. I immediately started on Yamalube 2R, which I've found to be an excellent, clean burning, oil. Cleaned the Twin Air air filter with kerosene and washed out just tons of red dirt. Rode the bike casually for a couple of months, but started thinking about doing the top end in December. Plus, most KDX owners recommend cleaning the KIPS valves yearly and who knows when/if these were last done. Here we go!
First, here's the cylinder head, just as I pulled it from the bike. Spotless!! At this point, I was almost ready to clamp the thing back on and go riding, but I'm glad I didn't- read on.....

Here's the top of the piston. A little carbon- pretty typical of what my YZ250 looked like after the previous owner used BelRay MC-1 for a couple of years. Can't expect Yamalube to clear this up....

This is the shaft connecting the bottom end to the top end valve gears. It has a reverse thread and a flat spot. It is VERY important to support this shaft when tightening or loosening the nut. There's a flat spot right above my finger- I used a small adjustable wrench to hold the shaft. I'm pulling the rubber boot down in this shot to expose the shaft. Also see "Top End Tips" article on JustKDX for further detail.

With the cylinder head sitting on my bench, it's time to disassemble the KIPS valve. Here's the gears that turn the valves via the connecting shaft from the bottom end. Still looking pretty clean...

Removing the KIPS valve
Here's where it gets ugly! This is looking into the main valve area and you can see how spoogy this looks. Awful. The bolts holding the cover on have been removed, but they were totally buried in spooge. THIS is where I was glad I didn't just cap the bike and go riding, and this is what I came to clean.

Here's a shot looking up into the exhaust port with the KIPS valve closed (top of head). The dark area where the arrow is pointing in the bottom picture is the powervalve.


This is a shot of the shafts prior to actually removing them from the engine. The gears on the shaft (at bottom of picture) are facing downward. The shaft on the left has a groove in it about 2/3 of the way up the shaft, the other doesn't. The covers for these gears were on TIGHT- use a good allen wrench to loosen them!

And here, finally, are the actual side valves, just as they came out of the engine after pulling the shafts above all the way out. Again, note the groove on the top of the left shaft, just above the collars.

After removing everything else, I was able to get the main valves out. Mine were heavily carboned and I had to chip away some carbon before I could get them out of the engine. Here you can see carbon on all surfaces. I'm sure this has a lot to do with my bike's rough running at low RPM


Okay! Time to clean and re-assemble. I checked the ring gap and it was .635mm which is awfully close to the service limit, so I'll be using a new Pro-X piston and rings.
Cleaning and Reassembling the Top End
And here's a bucket full of kerosene-cleaned parts almost ready for re-assembly. Before I actually put them in the top-end, I'll wipe them down again with a clean, pre-mix lubed cloth to remove any stray dirt. Moly lube will be used where called for.

Here's some things to check for in re-assembly. First, make sure you get the correct valves and valve gear shafts in the right place. The grooved shafts go on the left hand side of this photo. Before disassembly, I marked the top of the valves with a Sharpie marker. This made re-assembly a lot easier. I used Yamalube 2R to coat all metal parts during reassembly. Slide the main valve in first, using lube to make it easier. Check for smooth operation. Then, install the valve gear shafts in the holes(the 2 threaded holes above). Make sure they're pushed all the way in. Then insert the left side (respect to photo) valve. With the gear shafts all the way in, the valves should be shut, as in this photo.
In this picture, you can just see a shiny surface where the arrow is pointing- that's the closed valve. Slide the shaft that controls the main valve in and lock it down with the small allen head screw. By turning the shaft with your finger, you should see both the main valve and the left hand valve open and shut. When the left hand valve opens, it should open flush with the cylinder. If not, rotate so that it does. Likewise, when it's shut, it should be fully shut.

Here's the valves open. I could not get a shot of the valve opened, but you should easily be able to see it open. Also notice that the main valve is opened- compare the opening of the main exhause port in these two shots. Once you have the left hand valve opening and shutting correctly, install the right hand valve and gear. Install the ball bearing detent, spring, washers, and bolt. Set the timing on the right hand valve the same way. When the rod is turned completely one way, both valves should be shut and shut flush. When turned the other way, they'll be open and opened flush with the cylinder wall. Visualize exhaust gas flow and you should be okay.

Check for smooth operation at all times and add lube if necessary. If anything binds or feels stiff, fix it before going any further!! When you get done reassembling the head, your parts bucket should be empty, of course!

After re-assembling the KIPS valve, the rest of the top-end job is pretty straightforward. Make sure your piston rings center on the locating pins, keep gasket surfaces clean, torque everything to specs and you should be fine. The bike should start right away, and indeed, mine started on the 2nd kick after reassembly- just the way I like it!
Happy KDX'ing.